I have received a lot of emails about the striped curtains I made in my son’s bedroom and decided to share a little more info about how I made them. First off, I envisioned long floor length bold striped curtains for this space since day 1. I figured I could find some online, but after quite a while I couldn’t find the right shade or thick enough stripes. I even considered painting plain curtains. At that point, I didn’t know how the paint would look. Would it make the fabric crusty looking? Would it flake off? Could I even make the stripes even and would they look bad close up since this is a small space? After mulling that over, I decided my best bet was to sew my own curtains. So I headed off to the store and picked my fabrics. I measured my sons room from floor to ceiling to make sure I would make them tall enough (and ensure room to hem them). I also knew I wanted to do a grommet top panel. I chose a plain blue cotton fabric, but for the white I went with a thicker weave fabric. Almost like a light canvas. I didn’t want the sewn seems to show through the white when it was all said and done. I was worried how the two fabrics would go together when I started sewing…but they stayed straight and worked well together.
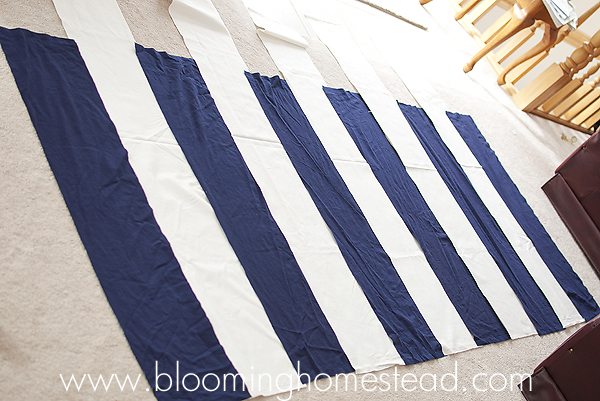
I got my cutting mat, roller cutter, and measuring stick and went to cutting! I cut out all the stripes and laid them out to make sure they were long enough. (FYI, I did my strips 39” wide, 10″ tall allowing a 1/2″ seam allowance.)
After I got all the strips cut I laid them out to double check length and style choice. Looks good, onto sewing!
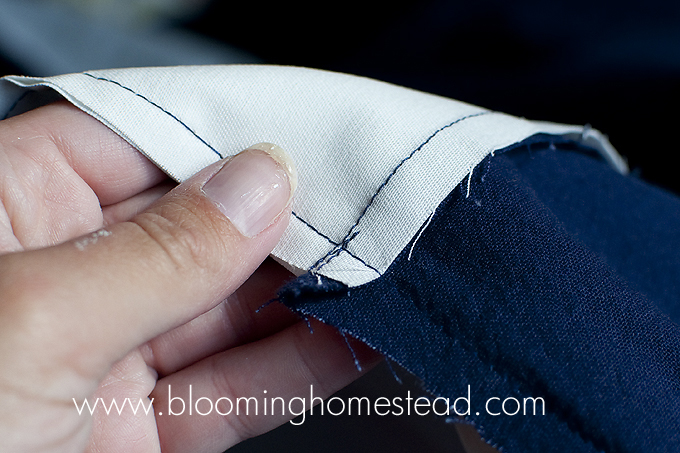
I know I took pics of this but I can’t find them. 🙁 So hopefully I can explain. I started at the top with 1 blue and 1 white strip, front sides together (so when it is open the back of the fabric is where your seam is) and sewed them together with 1/2″ seam allowance. After that, open it up and take the next strip and sew it to the edge of the previous strips. For example you sewed the top blue and white strip…next you would sew another blue strip right sides together to the white strip already attached to the blue. Keep adding on opposite color strips sewing the same way, front sides together. After I had the stripes all sewn together as a front curtain panel, I decided to add blackout fabric to the back of the curtains since my sons room faces East and it gets SUPER bright and he wakes way early! I just cut it to the size of the front striped panel and laid them FRONT sides together and sewed together 3 of the edges (top and 2 sides) leaving the bottom open for me to hem. After this I pulled the fabric outside right (I know I’m making no sense!) through the open bottom seam and now you should have your almost complete curtain panel with all seams hidden safely inside. At this point I ironed the panels and got them ready for grommets. Here is a closeup of the edges before I turned it outside right so you can seem the seams.
Now it was time for grommets. I bought 2 kits from hobby lobby and it came with easy instructions. These were super easy and kind of fun. 🙂
First use the template to mark where to cut the hole in top of panel.
Now cut out the holes where you marked.
The grommets are kind of like snaps. There is a top and bottom and you just snap them together with the fabric caught in the middle.
Next, you insert the bottom grommet.
Now set the top grommet on it and press hard together to snap them together.
And there you have it! Homemade striped grommet panels! I love how they turned out and I realized sometimes if you want something in particular…don’t settle just create it yourself!


These look so fabulous! Thanks for the tutorial! I’ve always been afraid to DIY my own curtains but now I just may need to do it!!
You’re welcome!
These are so adorable!! I have been so obsessed with stripes lately, I just purchased a stripe duvet cover…I wonder if striped curtains plus the duvet would be too much? Stopping by from the Southern Lovely Linkup 🙂
I am obsessed with stripes too! Thank you for stopping by.
Marie these curtains are stunning! Thanks for sharing the tutorial! Would love for you to stop by and share at the party! xo Bridgett
http://www.osiemoats.com/2013/02/link-up-party-2.html
Done
This is a great tutorial and I love stripes.
Thanks. 🙂
I absolutely love your gorgeous curtains.
So Nautical = So Me!
Thank you for the tutorial Marie. That is so kind of you to do 🙂
Awe, thanks so much!
they look so good! i really want striped curtains and i’ve tried painting them and didn’t like them. i’m definitely doing this!
That was my concern about painting them…I just didn’t know if they would look right. I love how these turned out. 🙂
I LOVE these curtains! I’d like to invite you to link up to Show and Tell Saturday at Sassy Little Lady!
http://www.sassylittlelady.com/blog/show-and-tell-saturday/show-and-tell-saturday-4-plus-a-giveaway
Kathie
Thank you! Linking up.
These look great and your son’s room is so cute! Thanks so much for coming out to the party at Clean and Scentsible. Pinned and I will be featuring these tomorrow. Enjoy your Sunday!
Jenn 🙂
Awesome! Thank you.
I love this. And that you pieced the stripes I have seen the painted stripes but this gives such a better stripe.
Thank so much,that is what I was nervous about with painting.
these are beautiful!!! I love the color combo
Thanks! I love how they turned out so bold.
Hello Marie ! Those curtains are gorgeous (so is the rest of the room !)’ I’ve recently made similar striped curtains from 2 Ikea curtains. You can take a look at theme on my blog. I hope you like them ! Cheers from France : http://frenchhappynest.blogspot.fr/2013/02/diy-ikea-striped-curtains.html
These look fantastic! You did a great job!
How stunning I have some cream curtains , if I could find similar weight fabric in teal I could jazz up my bedroom thank you
Featuring YOU today! 🙂
Ginger @ GingerSnapCrafts.com
http://www.gingersnapcrafts.com/2013/02/10-diy-home-decorating-projects-featured.html
Hi!
I just wanted to let you know that your post will be featured later this evening on Show and Tell Saturday #5 on Sassy Little Lady! Have a great day!
Kathie
http://www.sassylittlelady.com
About how much fabric did you use for these?
I love these curtains and am planning on doing similar for my sons room. The top blue panel looks thinner (stripe is not as wide) as the other stripes. Did you do this one differently? Thanks!
You are correct! The top layer was originally the same size however, I decided to fold it over (in half) and sew it to the backing so that it would be easier to add the the grommets through these layers of blue fabric only. The blackout fabric I used was very thick and it was easier to just attach the grommets through the regular fabric. Plus, I like the look it gave the top of the curtain panels. Hope that helps!
what wall color did you use?
The wall color is Repose Gray by Sherwin Williams. One of my most favorite colors!
About how much did this project cost you? Great job! Its exactly what I’ve been looking for
Hi Courtney, I believe most of the fabric was on sale but the blackout fabric (even on sale) was a bit pricier but I wanted REAL black out. I am thinking that I paid around $65 total. Its been a while though so I can’t give you an exact figure. I watched sales to help reduce the cost and that helped, but these are quite tall so I knew I would need several yards of blackout shade.
kind of unrelated, but do you know the name of the color paint you used on the walls? I’m trying to find the right gray for new baby’s room.
Hi Katie, the paint color I used is called Repose Gray by Sherwin Williams, I have used this color in many rooms in my home and love it!
do you remember about how much yards of each fabric you used?
Hi Alexandra, I am actually not sure about the fabric, I think I just grabbed several yards of each and I had purchased them at different times so I can’t remember.
How think are your stripes thats visible? Not counting what you allowed for inseam?
Hi Ester, My stripes were about 11″, so I cut them about 12″ to have a 1/2″ seam allowance on each side.