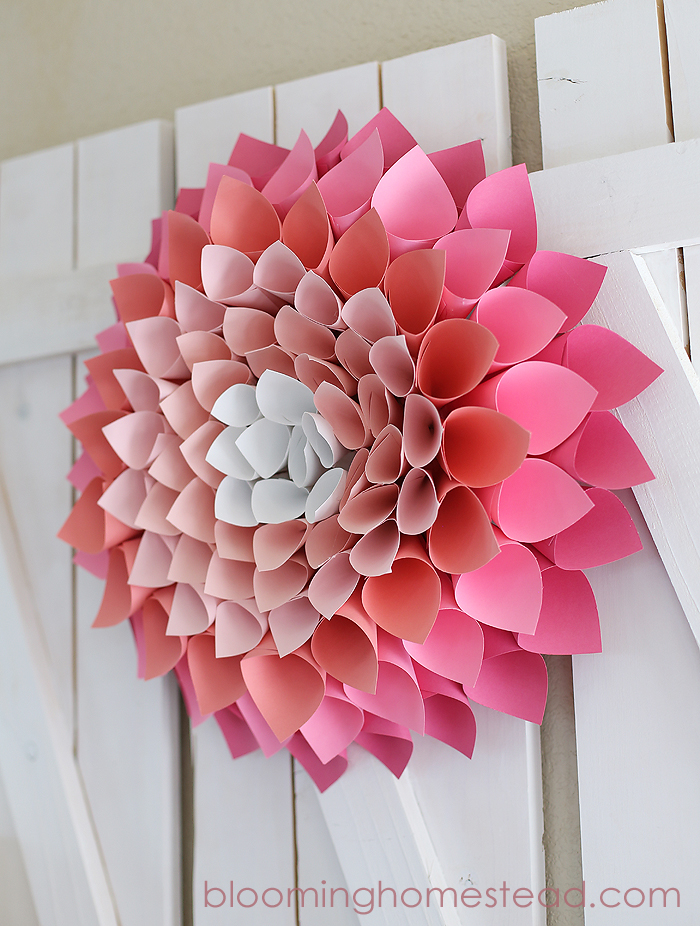
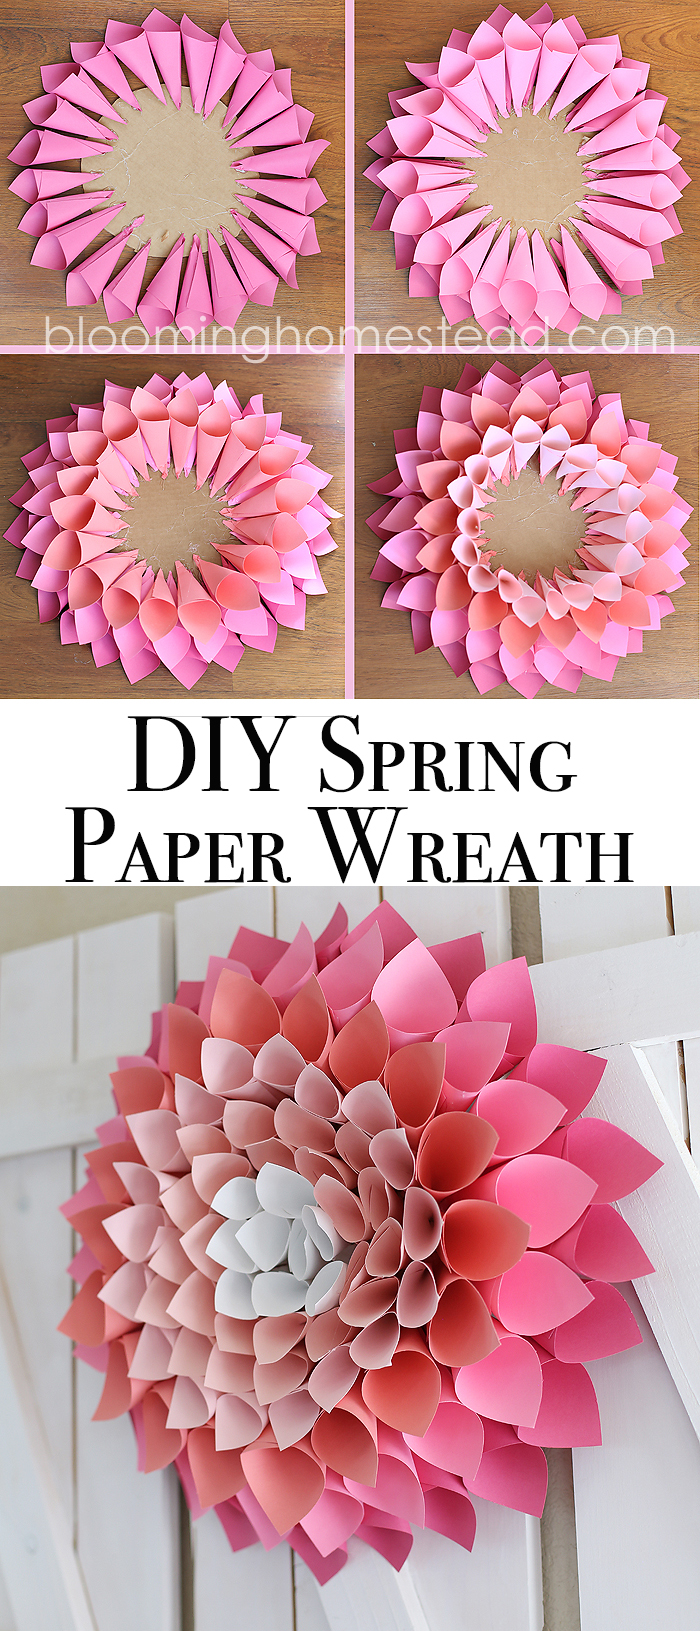
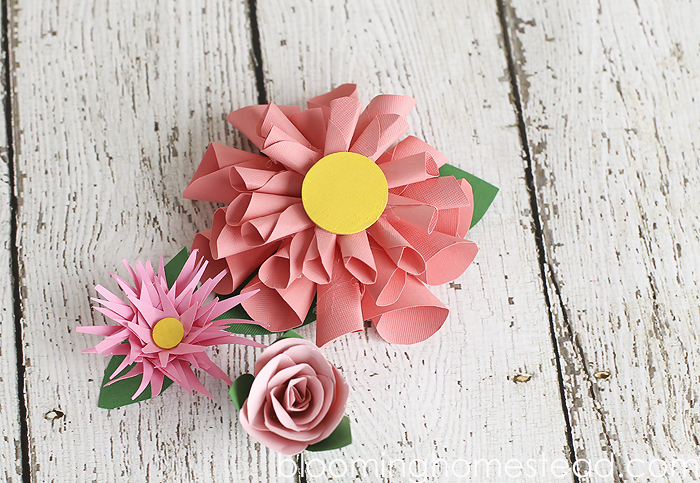
Here are the supplies needed to create your own DIY Spring Wreath:
- Several shades of pink cardstock (or color of your choice)
- Paper trimmer
- Hot glue
- Cardboard circle 12″ (cut your own or use cake rounds that are precut!)
- Bakers twine
Step 1: Trim 12×12 paper into 4×4 squares. Use several different shades of paper. For the inner layers you’ll cut smaller squares for small cones. Example: 3×3 squares, etc. You’ll end up making about 80 cones of varying sizes (but mostly the larger 4″x4″ size)
Step 2: Take squares and fold into cone shapes. (I created a youtube tutorial showing you how to make these. It was my first and most amateur video, but you’ll get the idea. 🙂
Step 3: Slowly start gluing on the cones starting in the outer edges and moving inwards. For the ombre effect, you’ll start with the darker shades on the outside with the lighter paper used on the inside.

Keep moving around until you fill in the very center! Now you’ll take a few inches of bakers twine and hot glue a “loop” on the back of the cardboard to hang your wreath.
If you need more details or want to see another version be sure and click here to learn more and watch the how-to video! I’ll be sharing my Spring Vignette this next week. I’d love to see how you’re decorating for Spring!
Looking for more DIY Spring Decor Ideas?


So pretty!! Love it! Hoping over from 30 day slinky party! Am going to pin as well.
Thanks for stopping by!
how is sopose to look like
This wreath is so, so lovely!!! Just ‘Liked’ you through Facebook! 🙂
Thank you!
I just Love this……..Can’t wait to make one!!!! Thank you!!!!
Thanks! It’s kinda fun!
Thank you so much for the beautiful flower. I made something like this only flat. 🙂
Thank you!
Sooo pretty! It looks like a huge dahlia!! You are amazing….
Happy St. Patties!! 🙂
x Crystelle
Crystelle Boutique
Thanks!
Love this! I have a quick question, what size squares did you cut in each color?
Thanks so much!
The outer 3 layers were 4×4″ (so 9 per 12×12 sheet ) inside smallers petals were 4×4″. This tutorial has greater detail and might help! http://www.bloominghomestead.com/2013/09/diy-halloween-wreath.html
So pretty! I am so ready for spring 🙂
I know! It’s got to be right around the corner!
Pretty. Looks like a huge pink zinnia.
Thanks, I love how it turned out!
I am SO ready for spring – I just wish the three feet of snow in my backyard would hurry up and melt already! Your wreath turned out great. Love the colours you chose!
I hear ya! Hopefully Spring will be here soon!
Beautiful wreath, bring on spring!
Thanks!
How much paper did you use & what size is the cardboard?
Probably about 12 (12×12) sheets total. Outer layers were more, I think 3 full pages for the outermost layer, and the white layer was less than 1. My cardboard was about 12″ in diameter. Hope that helps!
What a beautiful eye-catching display! This definitely gets me in the mood for springtime. Just letting you know that I am linking to this tutorial from my website this week if you don’t mind.
Thanks so much!
Cant wait to make this flower for my front door. Gonna try it in with yellow hues.
Send me a link, I bet it turns out beautiful!
Love this wreath! I am definitely going to have to make one. Thanks for sharing!
You’re welcome!
I was wondering if you can give me the size of the cardboard that you glued this beautiful flower wreath onto. I would love to try my hand at this wreath.
Love your site and keep an eye out for your ideas.
Nicole
Thanks! It was about 12″ in diameter! have fun!
WOW!!!!!! I love this Marie!!! So beautiful!
Thank you! It was fun to make.
Thank you so much for sharing your vlog. It made it seem so much easier! Dianntha
Your welcome! It is so much easier to watch the video sometimes. 🙂
Marie,
Thanks for this beautiful idea. I made it and then thought that the same idea in miniature would also make an amazing hanging decoration for our church nursery so I made the paper squares 1 1/2 inch and made the flower double sided. It is so cute. Thanks for the inspiration.
I bet it turned out so cute! I’ve made several variations and even made some felt ones for my daughters nursery that I just adore!
I live in humid Florida, but I’ve been dying to make one of these paper wreaths for my front door – which is covered by a front porch several feet deep. Still, I’m curious if you sprayed the wreath with any kind of polyurethane or clear coat to help it hold up in inclement weather.
Hmmm, I actually didnt and kept mine indoors. I’ve made them out of felt too that might be a better option. I live in Wyoming and I’m sure the wreath wouldn’t survive outdoors lol!
This is lovely! 🙂 Thanks for sharing!
I have shared your post on my Facebook page: https://www.facebook.com/happinessiscrafting/
My readers will love it 🙂
Thank you so much for sharing!
Hey Marie!
I was just wondering if you could give me the exact amount of sheets for each colour and the size of the squares for each colour. So you cut the sheets into 9 squares each?
Beautiful flower, by the way. I want to make it for my friend Dalia.