
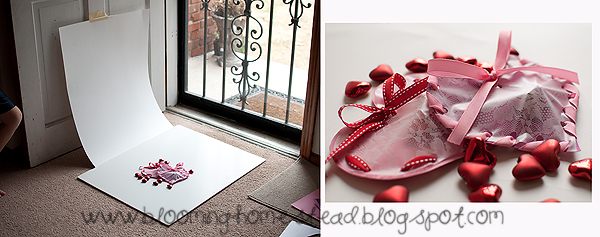
I have received lots of emails asking for advice on taking better pictures. I am no expert, but I do love photography. I am most comfortable with shooting🙂 photographing people since that’s what I do part time, but this blog has given me the opportunity to work on product photography which has been fun. I thought I would offer some tips for those wanting to take better pictures for their blogs. First off is one of the most important things regarding photography, lighting! Taking pictures in a room or area with ambient light will improve your pictures so much. Take note of the rooms in your home and when you get the best natural lighting. Open up those blinds! This way you don’t have to use your flash and it will make a huge difference whether you have a dslr or point and shoot. In my case, I do not have much ambient light at all without using my external flash and bouncing light even with windows open. However, I have found a few spots in my home that work well. The best place to get good light for me is to open my front door. The light spills in without being direct. When doing tutorials I will actually go sit by the front door in the entry area and craft away. This doesn’t make for beautiful backgrounds so I often use posterboard. It works well and the white posterboard helps evenly reflect and balance the light. Here are some pull-back shots of these things you have seen on my blog.
Sometimes in the afternoon when I have some light in my office I will use cardstock for little items.(this photo just happened because I was editing photos and wanted to eat a cupcake but it looked so good I knew I had to take a picture first!) De-cluttering the background makes a huge difference. It makes your photo look better and more appealing with the focus on your subject matter.(Also notice how I moved the paper to face more towards the light for appealing shadows in the right area)

Other times I will simply grab a scrap of fabric. *I sometimes try to take a picture of the craft or home decor item in its spot, but for the most part I want to showcase what I’ve made which requires me to move it to where there is enough light. (hopefully my next house will be brighter!)
Here is another declutter photo. Far from perfect but I wanted to show how I crop or move things out of the way before I take the photo to get a clutter free background. Simple cropping can be done in any free editing software easily.
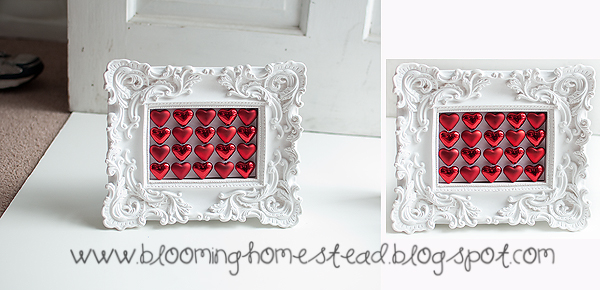
As I mentioned before, I hate having to use my flash. I do most of my crafting at night and so I have to wait until daytime to take pictures which is frustrating for tutorials especially when my son is around it gets trickier! However, I think natural light is worth it. Here are a couple picture of flash versus natural daylight. Can you tell a difference?
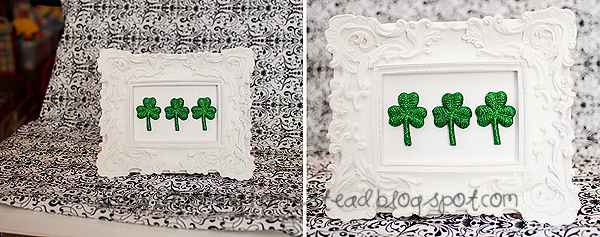
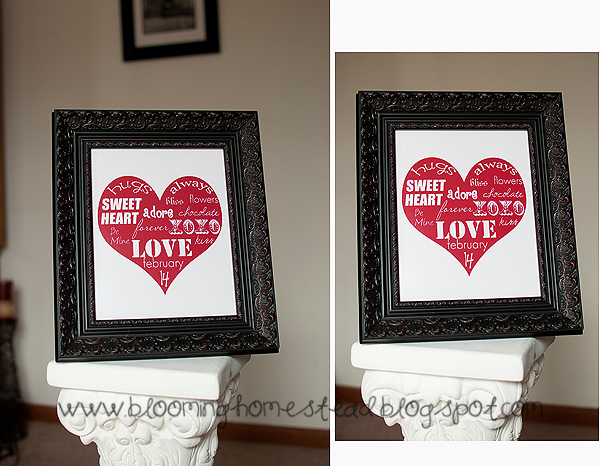
FLASH ON LEFT NATURAL ON RIGHT

Notice the “deer in the headlights” look of the flash pictures? See how much more natural the lighting and shadows are from the ones on the right? Plus the backgrounds look better and not so dark as well. It is just a small thing that really makes the pictures pop!
Left is flash, right is natural light.
Save as Draft

I hope this helps someone out in someway. 🙂 I’m no writer and its tough to put what I want to say on paper correctly!
Please click over to see the rest of this post! Thanks so much!


I think you should just retitle this post, “Meg, learn to take a picture already!” Seriously thought this is really helpful though.
You did the post. This is super helpful and what a huge difference the no flash pictures make.
Thanks for this helpful post…I had to laugh at your front door pics..I have been photographing at my back door, with my butt sticking out the door…goodness only knows what the neighbors think…but anything for a good photo, right!!!
thank you so much for sharing these helpful tips. i myself find natural light works best as well. do you mind sharing what camera you’re using? and what do you do if you can’t find natural light inside the house? do you use studio lighting?
I use a Nikon d90 and usually a 35mm 1.8 lens. I have used these for the past 3+years and love my Nikon. The 35mm is a wide angle, affordable, and my lens of choice and really helps out in those low light situations. I really, really work at getting natural light if at all possible. In my old house(where these were taken) many times I would take photos in my doorway with the door open just to get natural light! If natural light isn’t available, I use a speedlight with diffuser…usually always facing behind me to reflect of the ceiling or wall to mask the harshness of flash. Many times…even in the day I will use my speedlight to supplement the natural light and even out shadows. I also have a reflector that I often use on the silver side. White foamcore board works to and helps reflect the light. I have debated about studio lighting, but thus far have not needed to go that route. If I were looking at studio lighting…I would go with alien bees and softboxes. Many photographers use their speedlight off camera and shoot through umbrella’s(not the rain kind:) as well. Hope this helps!
Thank you for the tips!
Love these tips, Marie! Thank you so much for the helpful post!
Much love-
Erica from Designing Vibes