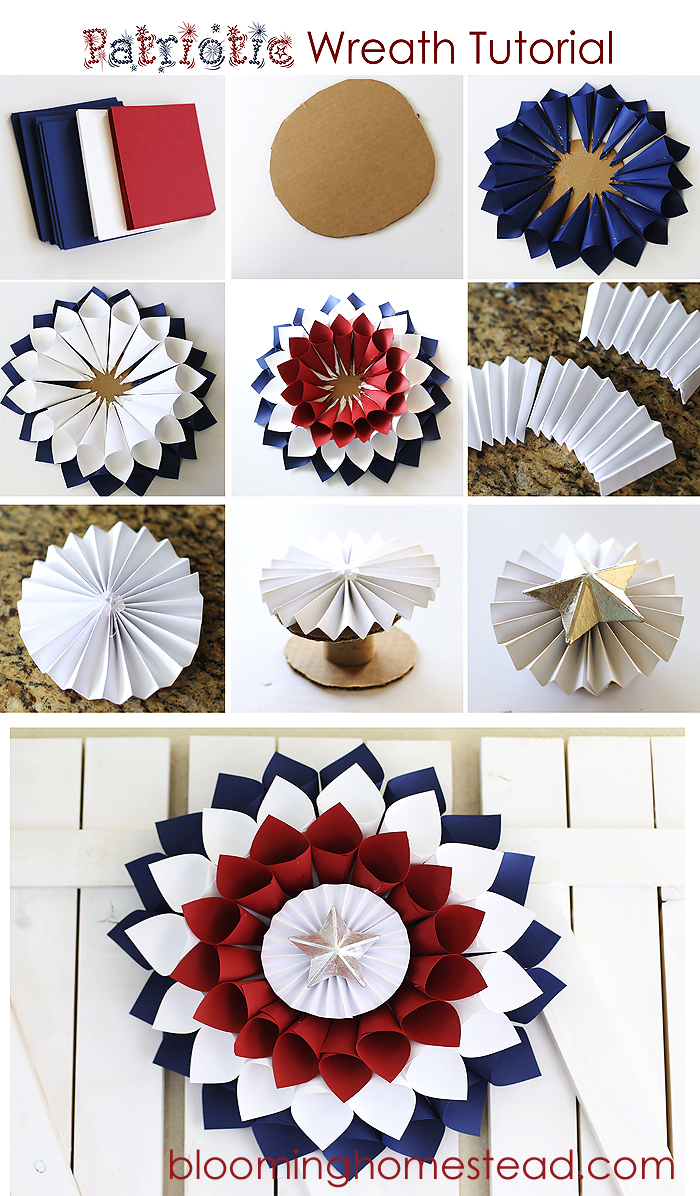
Check that out here for step by step tutorial to help you make one of these simple paper wreaths.
Here are the Supplies you’ll need to make a DIY Patriotic Wreath:
- Red, White, and Blue Cardstock (I used 12×12)- cut into 4″ by 4″ squares, I also cut a few 3″ by 3″ squares to use in the center.
- Glue gun & glue sticks
- Paper Trimmer
- Cardboard for backing (or buy precut baking rounds)
- bakers twine (to hang finished wreath)
- White scrapbook paper
- paper mache star
- silver spray paint
- paper tube (paper towel or toilet paper tube)
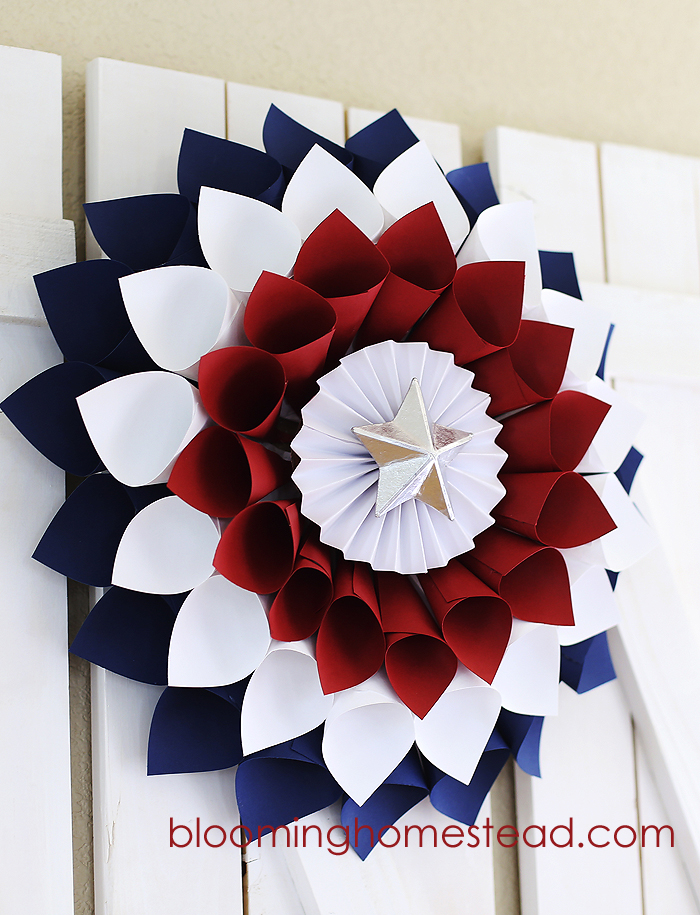
As you can tell, I just used a circle of cardboard as my base. (an uneven circle that is!) Then I glued on the petal cones, added a white pinwheel with a silver paper mache star to top it off.
I love how it turned out, I’ve already started working on several Patriotic projects that I’ll be sharing over the next few weeks. I think you’ll love them too.
You can find my Spring Wreath here.
And my Halloween Wreath here.
Pages: 1 2


Love it!! I just love Red, White and Blue decor. It turned out so perfect for summer. I may just have to make one of these too.
Oh my goodness, that looks amazing! You did an incredible job with that wreath and I love your other wreaths as well.
If you have a minute to spare I would be thrilled if you could share your post at this week’s Say G’Day Saturday party. It has just started and this would be a great addition.
Best wishes,
Natasha in Oz
I absolutely love this wreath! I love projects that can be tweaked for different holidays. This one would be perfect all summer long, and now my wheels are turning about other variations that you could do. Thanks for sharing!
Love it!
This is gorgeous! Love the star in the middle especially. Tweeted it out so others can see it!
For your patriotic version, what size paper squares? I see you used 4×4 for the spring version but these cones look larger. Totally loving this project.
Yes Chrissy, I used 5×5 for the blue and white, and 4×4 for the red. Hope that helps!
Marie, I am completely in love with this! It is perfection! 🙂 I featured it yesterday in the link party features. Thank you for taking the time to stop by and link up!
Thanks for sharing at the Say G’day Saturday linky party. I just pinned your post!
Hope you can Say G’Day again this weekend.
Best wishes,
Natasha in Oz
LOVE this! I’m a school counselor and off all summer. My Mom is also dying of cancer, and I’m looking for inexpensive, fun things to do with her! We are going to craft this soon!!! http://megandewitt.blogspot.com/
Hi Megan, I am sorry to hear about your mom but yes, I think this would be a wonderful craft for you to do together. I’m wishing you all the best!
Hi Marie, I love the wreath. It is so simple but makes a colorful statement. About how many sheets of card stock did you use for each color and what is the finished dimensions of your wreath? Thanks!
I am horrible at keeping track of how much paper I actually used, but I am thinking I bought around 6 12×12 sheets of each color. It all depends on how thin you make your cones, some of mine were wider than others. I did have some extra paper. My finished wreath was 17″ in diameter. I hope that helps!
I love these paper wreaths. You have them down to a science. I especially like how you fill the centers, so resourceful.
Love this! We shared you link on our blog today!
Thanks so much Heather!
Your wreath is gorgeous! I can’t wait to make one too! I love it!
Thank Jenny, it is super easy too!
Love this! Do you have a tutorial on the pinwheel? And what size was the paper you used for it? Thank you!!!
Hi Melissa, I don’t have a tutorial on that. But I believe it was 12×12 yardstick cut into 2″ strips. I hot glued them together to make one giant strip of about 30″ or so. After you accordion fold and put it into a circle you’ll know if you need more paper to make the pinwheel lay correct or if you need to trim it down. I’ll try and put together a quick video this weekend to make the task a little more clear. 🙂
I just finished my patriotic version and it’s lovely, but I think the toughest part was the pinwheel center. How did you get it to come together in the middle, how many strips of accordion-folded paper did you use, and were they card stock? I glued 3 or 4 pieces together but it just seemed too rigid to come together in the middle. What a fun project for my daughter and me! Thanks!
Hi Kris, I am not sure I took exact measurements, but I’ll try and offer some tips. I did use 12×12 cardstock cut into strips about 2″ wide. I think I used about 2 1/2 of these accordion folded about 1/2″folds. I tape or glue each strip together for one big accordion strip before I fold it then I know if it is too much paper and needs a trim…or not enough and I need to add some paper to get a full circle. I hope that helps! It is kind of trial and error to get the hang of it. 🙂
I did a quick and dirty version using construction paper on a paper plate base. Here’s a photo: https://flic.kr/p/uCqoAh
Hi Beki, it turned out super cute!! Thanks so much for sharing.
What a great wreath! Thanks for the tutorial! Here’s mine:
http://pin.it/bvLe44_
You are so welcome!
This is a great craft that I have used with some of my upper elementary kids around The Fourth of July. This year we are putting a Thanksgiving twist on it. Instead of red, white, and blue we are going to use red, yellow, and brown. We will replace the white paper in the center with brown and the star with a cut out turkey head and neck. The final product we are shooting for is a Turkey wreath the kids can hang up! Thanks for the great project!
That is such a fabulous idea! I’d love for see the final product. So fun!
The simplicity and the vibrancy of this wreath is what caught my eye! It is also cost efficient! Love your ideas and designs! Thank you!
The simplicity and vibrancy of this wreath caught my attention. It is also cost efficient! Love love love your ideas! Thank you!
I just found your website, love it. Thank you
You’re welcome!