• Home
  • FAQ’s
  • Contact
    • About Me
    • Policies
      • Privacy Policy
      • Disclaimer Policy
      • Terms & Disclosures
  • Privacy Policy
  • Terms & Disclosures
    • Facebook
    • Google+
    • Instagram
    • Pinterest
    • Twitter
    • YouTube

Blooming Homestead

  • Gallery
  • DIY/Crafts
  • Home Decor
  • Recipes
    • Breads
    • Desserts
    • Dips/Appetizer
    • Main Dishes
    • Soups/Sandwiches
  • printables
  • holidays
    • Valentines
    • St. Patrick’s Day
    • Easter/Spring
    • 4th of July
    • Halloween
    • Fall/Thanksgiving
    • Christmas
  • Organization
    • Home Binder Printables
    • Printable Calendars
    • Cleaning Tips & Tricks
    • Organization Tips

Lighted Haunted House

in DIY/Crafts, Halloween on 23/09/15

Check out my latest project as a member of the FloraCraft® Design Team, a big thank you to them for sponsoring this post.

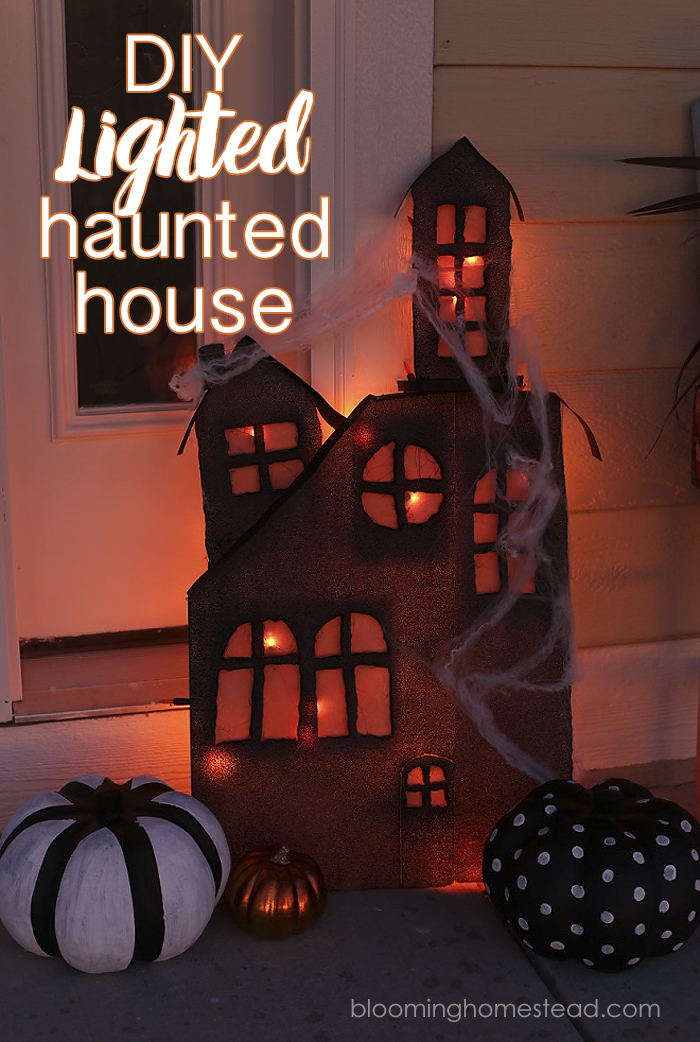
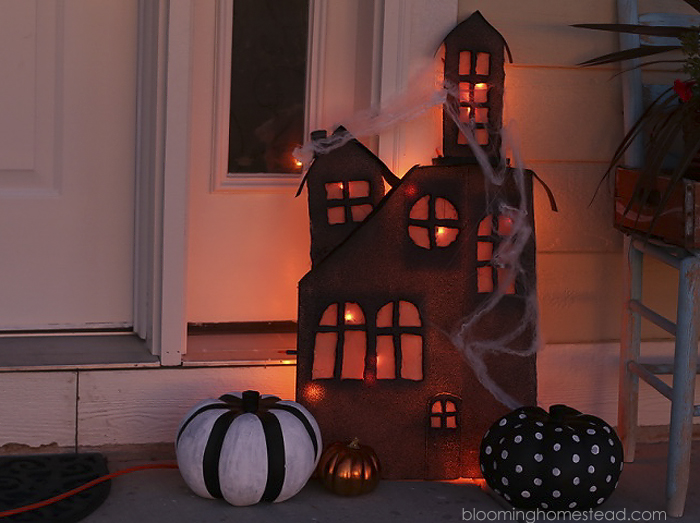
October is right around the corner and today I’ve got a spooky and fun project to share with you. This lighted haunted house was so simple to make and looks so cute on my front porch! I figure that even though the house is being packed up for the move I can still enjoy a little Halloween decorating. 🙂

This diy lighted haunted house is so simple and easy to make, be sure to check out the full tutorial on www.bloominghomestead.com

Did you know that FloraCraft® put together a fun Halloween catalog full of craft ideas? Not only do they feature some spooktacular projects, but they include full tutorials and photos for each project. You can find the full Make it: Fun® Halloween Booklet here.

87780_FloraCraft_Sept2015_HW_Ebook_Ad_2

I decided to recreate the Lighted Haunted House on a larger scale for my front porch and it turned out so well. You can find the full tutorial in the booklet but I’ll walk you through how I created this in a larger size.

Here are the supplies you’ll need:

  • FloraCraft® Make It: Fun® Foam (2) 1/2″ or 1″ sheets
  • Black Paint
  • Orange scrapbook paper
  • Black cardstock 
  • Battery-Operated LED String Lights Cardstock
  • FloraCraft® StyroCutter® Plus
  • Floral or t- Pins
  • Low-Temp Glue Gun
  • Scissors

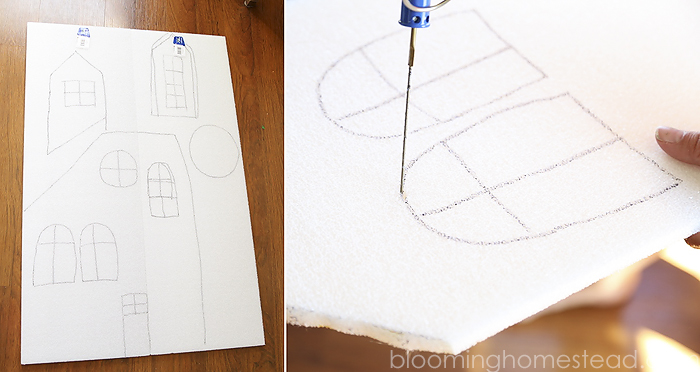
To start, I sketched out the haunted house on 2 large sheets of 1/2″ foam. (If I were to do it again I would use the 1″ to make it easier to attach the lights with the pins). Once you have it sketched out you can start cutting with the Styrocutter®.  One tip when using the styrocutter is to go slow and let the wand move through the foam at its own pace then you’ll get a nice clean cut. 

This diy lighted haunted house is so simple and easy to make, be sure to check out the full tutorial on www.bloominghomestead.com

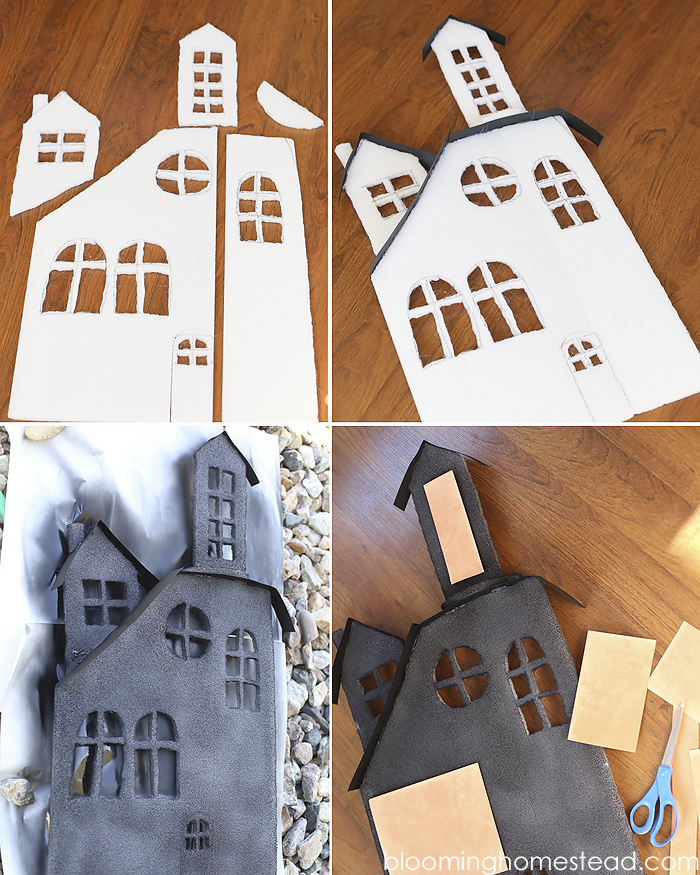
After you get your foam cut, you’ll cut the roof pieces out of card stock and you’ll start assembling the house. When assembled you can paint your foam (I used black spray paint) and cut out orange paper squares for the windows.

This diy lighted haunted house is so simple and easy to make, be sure to check out the full tutorial on www.bloominghomestead.com

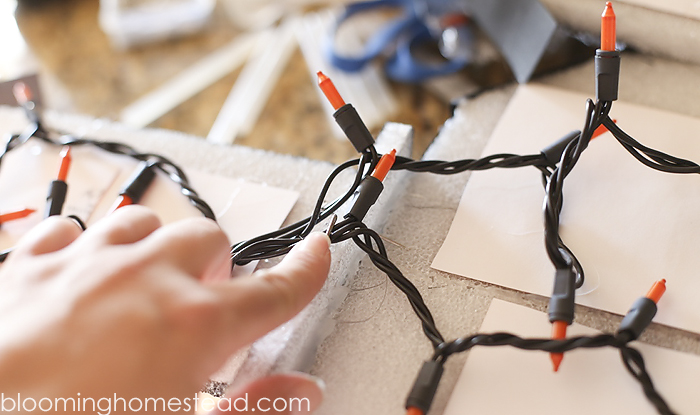
After attaching the paper windows, you’ll attach your lights to the back of your haunted house using pins. Do NOT pin through the wires. I didn’t have any led lights, only these orange ones and so I pinned them on. I wouldn’t recommend these types as they get a bit hot, so I’d stick with the LED.  

This diy lighted haunted house is so simple and easy to make, be sure to check out the full tutorial on www.bloominghomestead.com

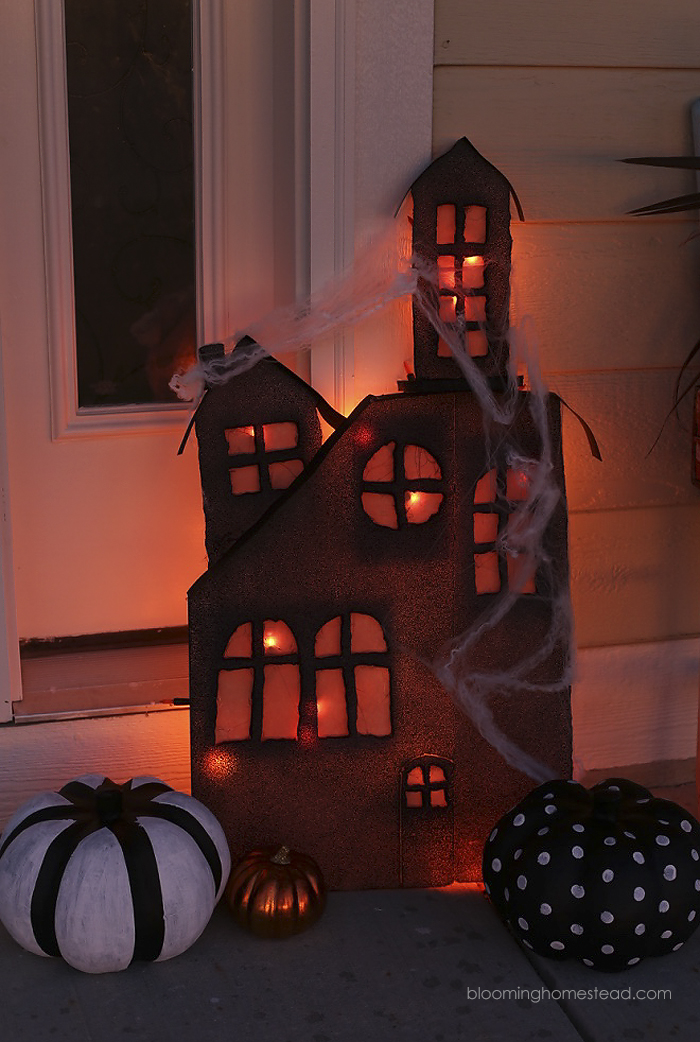
And that’s it! You’re left with a super cute and spooky house.

This diy lighted haunted house is so simple and easy to make, be sure to check out the full tutorial on www.bloominghomestead.com

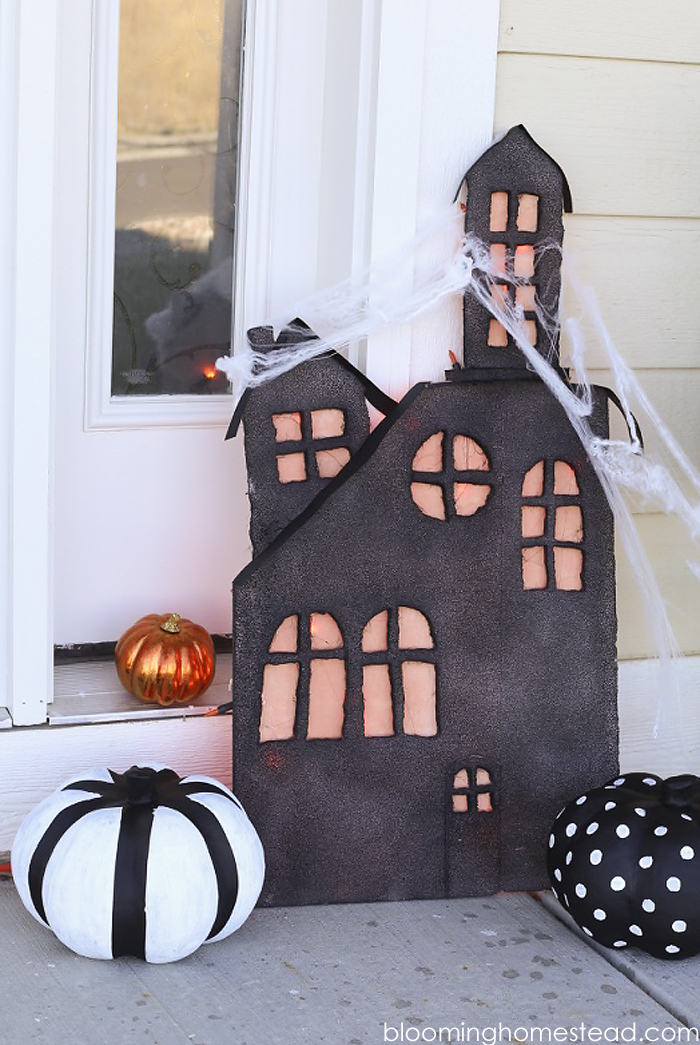
Here’s how it looks in the daytime.

This diy lighted haunted house is so simple and easy to make, be sure to check out the full tutorial on www.bloominghomestead.com

So fun right?

This diy lighted haunted house is so simple and easy to make, be sure to check out the full tutorial on www.bloominghomestead.com

I link to these parties here.

3 Comments

About Marie

Marie is the author of Blooming Homestead and loves to share her latest home decor ideas, crafts, recipes, home organization tips, and diy projects.

« Spooky Halloween Mirror
Creative Collection Link Party »

Comments

  1. Melanie says

    September 23, 2015 at 5:29 pm

    Such a fun project for Halloween!

    Reply
  2. Sharon says

    September 25, 2015 at 9:46 am

    Fabulous, and really spooky fun! This is great for a party, the front porch, just about anywhere! Thank you!

    Reply

Trackbacks

  1. DIY Halloween Treat Stand says:
    October 3, 2015 at 10:20 pm

    […] Paper Pumpkins by A Place of My Taste | Tabletop Foam Ghosts by Reasons to Skip the Housework | Lighted Haunted House from Blooming Homestead | Giant Hanging Ghost by A Girl and Her Glue Gun | Ghost + Tassel Garland by a A Girl and Her Glue […]

    Reply

Leave a Reply Cancel reply

Your email address will not be published. Required fields are marked *

Welcome! I'm Marie an avid crafter with a passion for home decor and organization! I am so glad you are here!

  • Facebook
  • Google+
  • Instagram
  • Pinterest
  • Twitter
  • YouTube

Popular Posts

Follow me on Instagram

[instagram-feed]
Friends of Pfister You blog. You Profit. Sign up for SocialSpark!
“Blooming Homestead is a participant in the Amazon Services LLC Associates Program, an affiliate advertising program designed to provide a means for sites to earn advertising fees by advertising and linking to amazon.com."

Copyright © 2023 · glam theme by Restored 316

Copyright © 2023 · Glam Theme on Genesis Framework · WordPress · Log in

  • Home
  • Privacy Policy