Here are the supplies you’ll need to complete this project:
- contains affiliate links
- General Finishes JQ Gel Stain, 1 quart, Java
- General Finishes SQ Gel Topcoat, 1 quart, Satin
- KILZ nterior Stain Blocking Primer/Sealer Oil Base 1 quart
- Playtex Rubber Gloves (I used several pairs)
- semi-gloss paint (I used the color swiss coffee by behr)
- Foam Brushes
- T-Shirt Cloth Rags – 1 lb. bag
- Carpet Protection Film
- FrogTape
- 1-Inch Angled Brush
- Sanding Fine grit
- General Finishes JQ Gel Stain, 1 quart, Java
PREP:
Tip #1: I wish I would have realized before starting this project that the stain is quite messy and will drip all over your carpet even if you are being super careful. After doing my first coat of stain, I quickly realized my mistake and applied this carpet protecting plastic that sticks down and it worked wonderfully to prevent stains since we had no plan to replace the carpet any time soon. (For some reason the stain *seemed* thick and I thought I would be okay…I was wrong!) Also this is the time to tape off any wall or molding areas to prevent stain bleeding.
Tip #2: Prepare for this job to take a while, especially depending on the number of ballisters you have to paint. For some reason I was thinking I could have this finished within a few nights work. Friends…it took me like 2 weeks! If you don’t have kids, you can probably nail out the ballisters a bit quicker but seriously this felt like the project that would never end. There was a lot of 24 hour waiting periods, no working when the kids were around, and TONS of touch up.
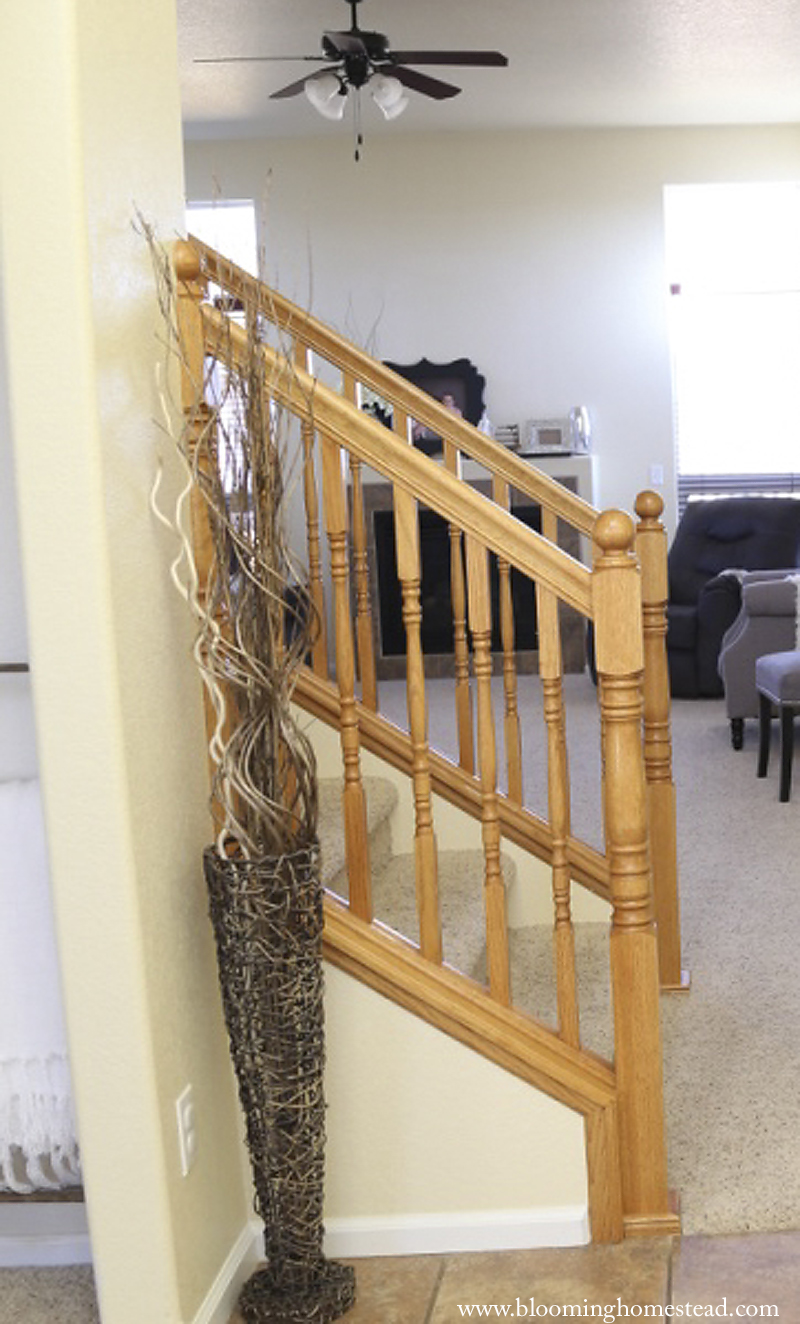
Tip #3: Figure out your ballisters before you start. I assumed I would be able to tape around the ballisters to protect them from the stain. However, I didn’t realize that mine had a decorative piece on the underside of the top, and the top of the bottom railing which ultimately required me to do a lot of touch up and a lot of detail work with the primer and paint.
Tip #4: Wear high quality rubber gloves. This stain will get all over your hands and nails and stain your hands for days. (I learned the hard way by thinking I would be careful)
GETTING STARTED:
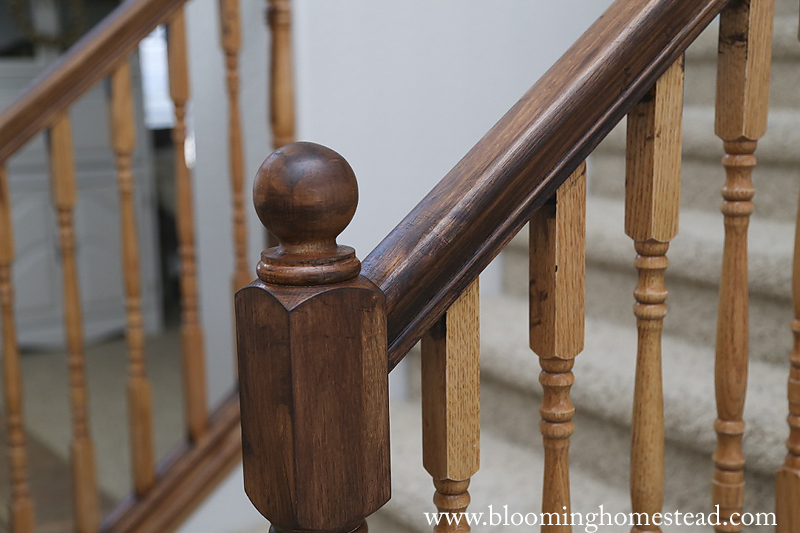
Step 1: You’ll start by lightly sanding down the finish on the existing banister. Because we were painting the ballisters as well, I tried to sand them but because of the round spindle designs it was basically impossible. Because of this I knew I would need to either replace them or paint them with an oil based primer for best adhesion.
Step 2: Wipe down the banister and spindles to make sure they are all clear of dust.
Step 3: Start applying light layers of the stain onto the banister with an old t-shirt. (I bought bundles of cotton rags at the home depot paint department and they were a lifesaver). Try to coat it evenly and let it dry overnight. I was warned this stain had a very strong odor and to only complete this project when the weather was warm to ventilate. While it is ALWAYS good to have ventilation, I was expecting something awful, but honestly we didn’t mind the smell too much. I much preferred that over the smell of the primer! Here is the look with 1 coat of stain. I actually think it looks quite rustic and lovely and considered leaving it lighter like this.
Step 4: Repeat step 3 until you have the color you desire. Here it is after 2 coats.
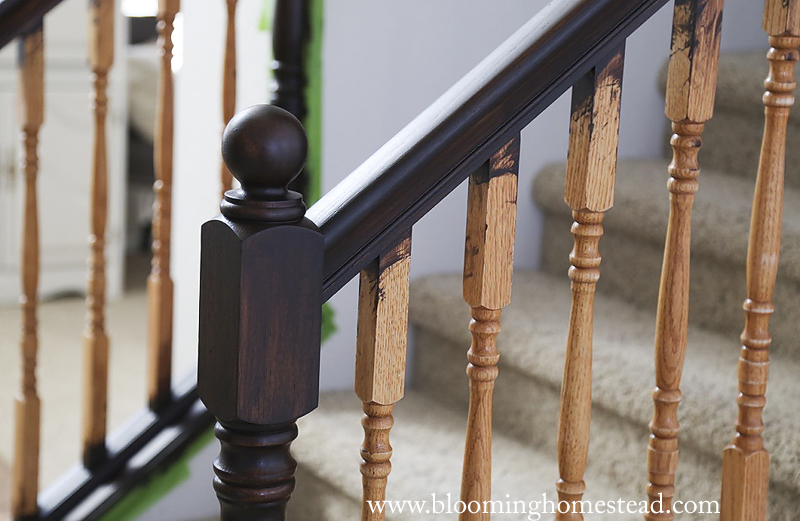
And the final coat.
Step 5: Time to start painting the spindles. Guys this was the worst part! If I could do it over and had it in the budget, I would have just replaced them. This was so time consuming to go over them with primer and let it dry. Then to go back over and cover them with 2 coats of paint. (I chose a semi gloss finish so they would be easier to clean after). Each time you’ll need to let the paint dry the appropriate amount of time. I usually waited 24 hours. This is where things got really annoying…no matter how careful I was the paint had some drip lines, also the paint had a few splatters on the stain. This started the process of going back and sanding it down, applying more stain, waiting. Then I’d realize I got stain on the paint and would have to go back and detail fix that. This felt like it took me FOREVER!!! Hence the reason I don’t have any pictures of this process because I was so over it at this point.
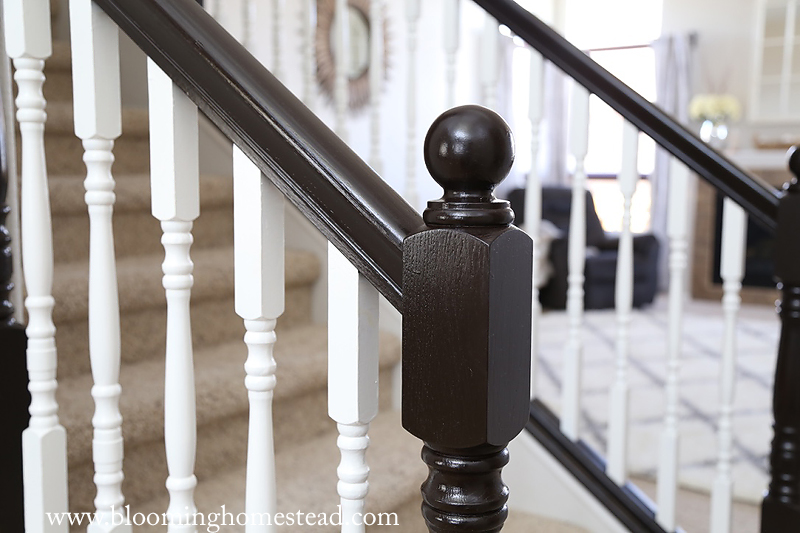
Step 6: When I finally had the ballisters painted and the banister all ready to go I applied the top coat to finish off the stain. This added a nice sheen that mimicked the look of the semi gloss spindles that I really liked!
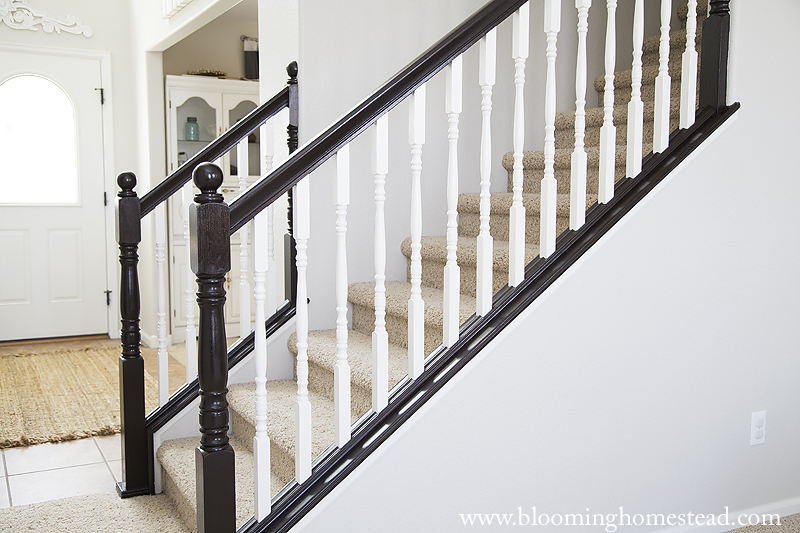
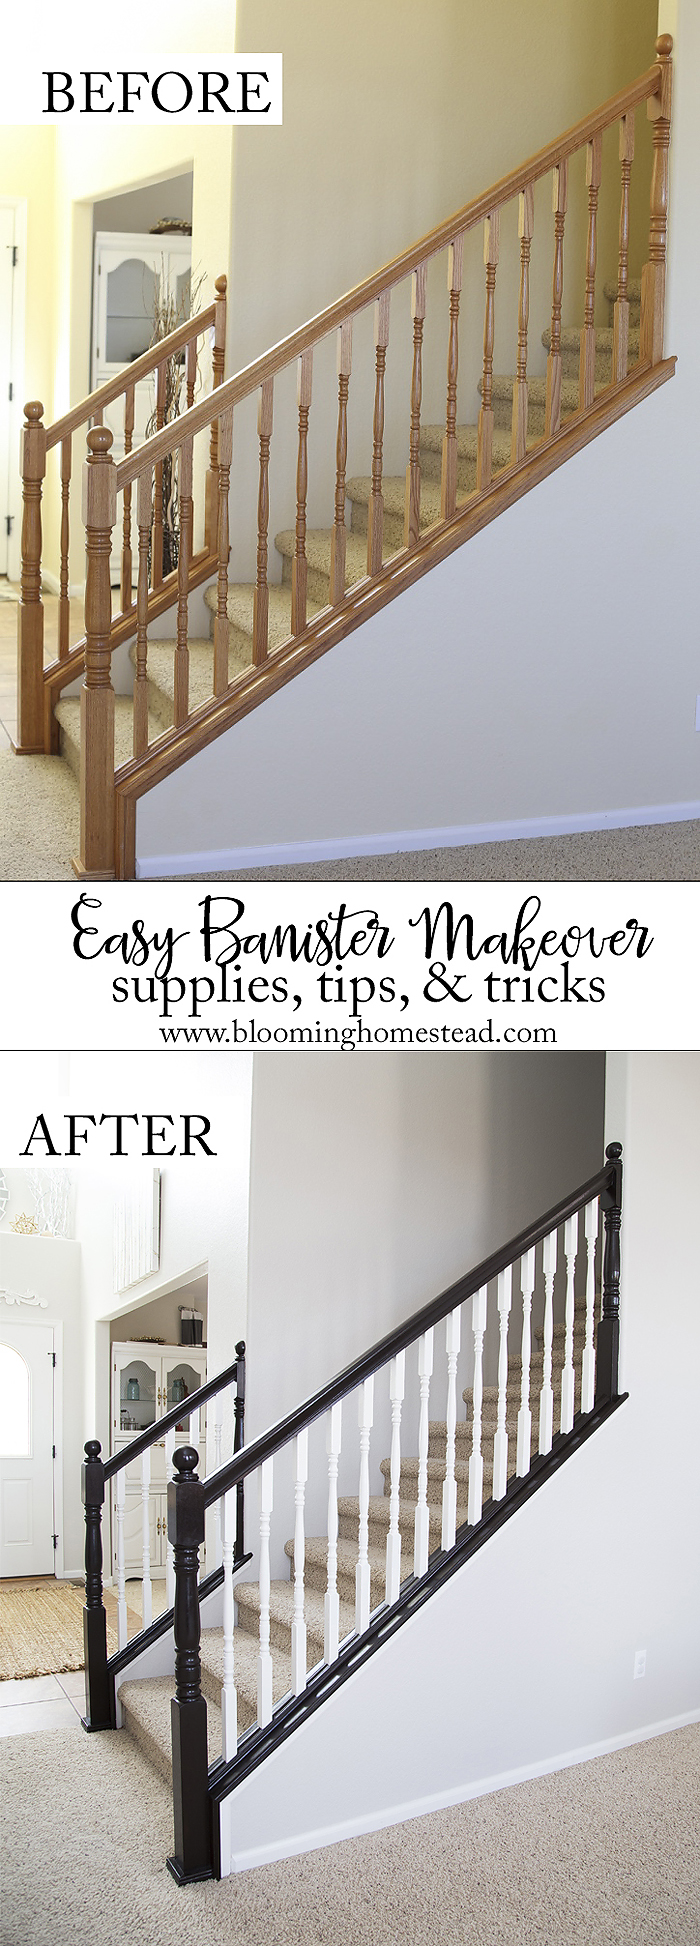
And I was FINALLY done!! To say I was ready to celebrate is an understatement. Guys, this project almost had me in tears, it was so painstaking but the results are gorgeous. It really updated the whole look of our home and since it is visible from the foyer it looks amazing. I am super happy with the results. Another before:
and after:

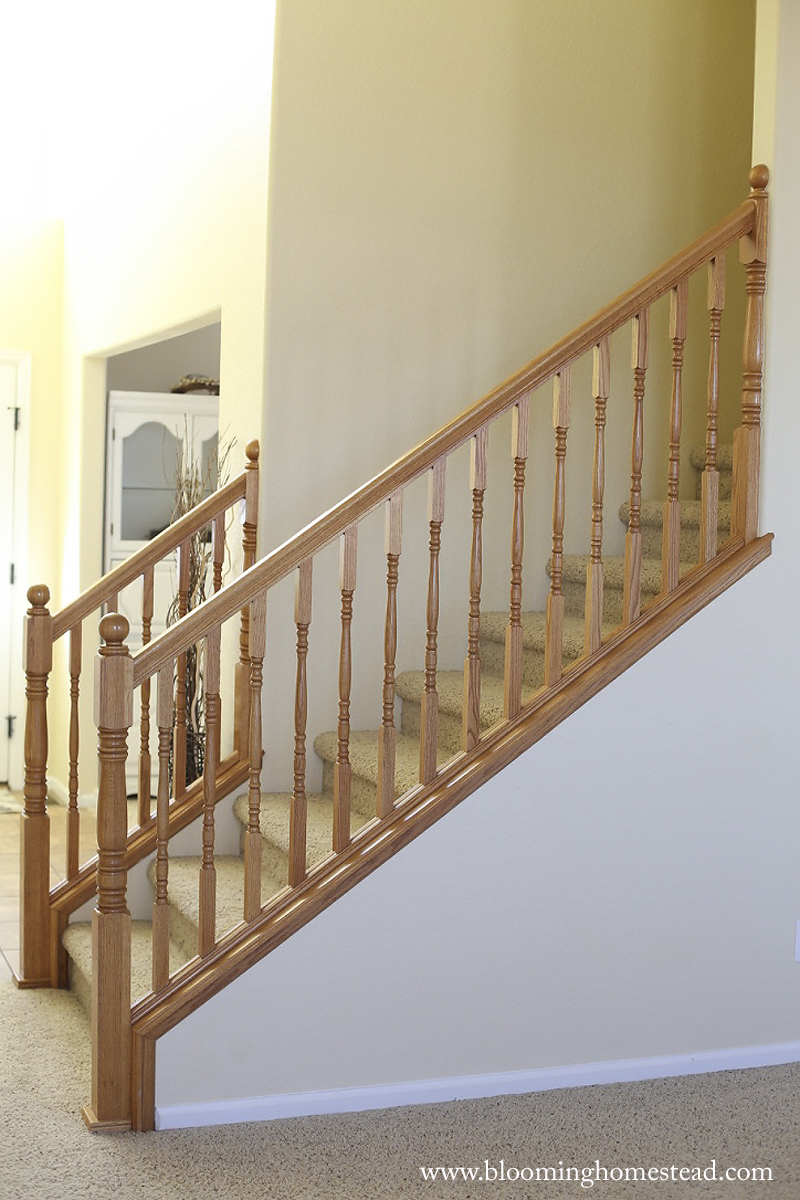
Before:
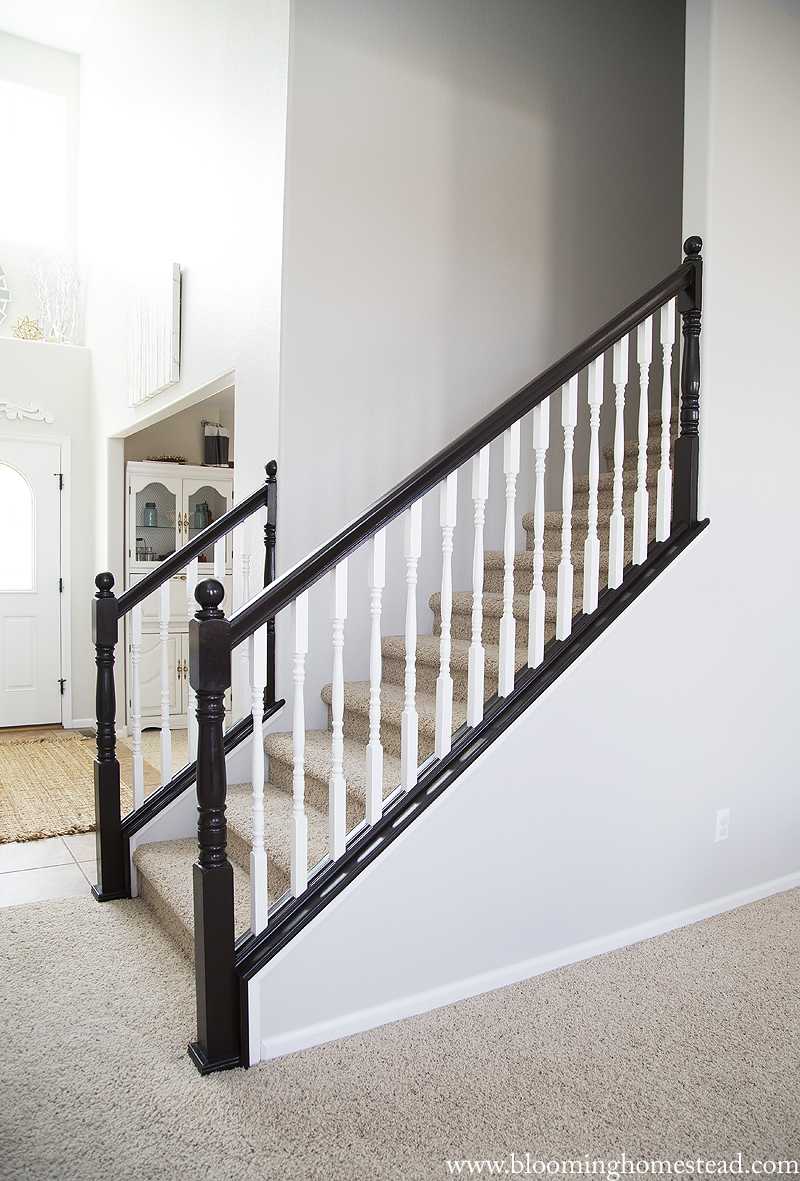
After:
Would I do it ever again? I actually would. As awful as it seemed at times it makes such a huge impact for such little cost! Leaving more money to spend on other areas of home updates. Feel free to ask any questions!


This is amazing! I love the before and afters, they show such a huge difference! Love it, and glad you lived through it
Simply Stunning !! Nicely done. We did this gel stain to our front exterior door and it really made the new house paint pop. We received many compliments from the neighbors. We also need to redo our kitchen cabinets. I may consider this process, especially after pricing new cabinets. Thank you for sharing all the tedious steps. It was well worth it ….. your outcome makes the banister look so current.
Thank you so much Carol! Yes, it totally made the house feel updated. I love it!
Hi, I am in the process of doing my stairs in Java with another coat of antique walnut in top. I haven’t put my top coat tet, but am nervous because I heard the top coat makes all mistakes and the uneven coats show. Did you have this problem? ?
Hi Julie, I think the topcoat does add some shine which highlights some imperfections. I thought it turned out nicely though and am happy how it turned out. It added a beautiful finish.
Your stair rails look beautiful! I started this process literally over a year ago and became so frustrated that I’ve left it unfinished for so long. How were you able to perfectly paint the banister where the white paint meets the stain? Being a perfectionist and ending up with such an imperfect job has brought me to tears!! Any tips??
Hi Nadine, oh my goodness this process was so painful! I can understand the tears! Let’s just say it took me a few times of correcting to get it right. At first I thought I could tape it but it just didn’t work. I had to use a firm angled small brush and just went slow. When I would have white on the stain I would wipe it right away and restain over it. It was hard but ended up working out. Good luck!
Beautiful!! My stairs are similar, except the “bottom” is also painted white instead of stained like yours is. I like yours better.
My question is off-topic from your stairs… what color is the paint on your walls? I love it!!
Thank you so much! My wall color is Agreeable Gray by Sherwin Williams and I had it lightened b 25%. It took me forever to finally pick a color that I loved!
I love this makeover! I’m about to add a wall mounted handrail across from my stair railing, to help my elderly parents. The process of picking out the handrail led me to your site, and now I think I’m going to refinish my stair railing too. More work than I was planning for but it will look gorgeous! Great job.
It’s a lot of work but worth it!
What tool did you find worked best in the spaces between spindles?! I am applying the 2nd coat in about 16 hrs and wondering what’s the best way to create an even sheen of stain between spindles. Some say use sock, others say has sponge brush..
I used a t-shirt cotton strips.
I am just starting this same project. I would like to know more about your prep on the stained areas. Did you use a varnish remover before you sanded? I didn’t think I could get the stain to be absorbed it I didn’t take the finish off. The remover was a little messy but I think I will have a nice even stain when finished.
I am a big fan of taping to avoid the splatter, trick is to remove it before it drys andetape for each coat. Wish me luck
Hi Kathy, I didn’t use any sort of remover, just sanded off the shiny finish and the gel stain penetrated it for an even stain. I was told that was the benefit of gel stain is it didn’t require complete removal! Just a little sanding. 🙂